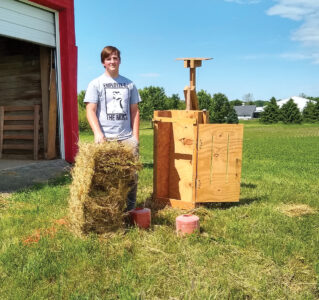
When you build your own wooden hay baler, you can hand bale hay without the need for equipment, so you can shape and put away hay.
I have a 10-acre farm east of Noblesville, Indiana. I rent out 6 acres to a farmer who grows corn and soybeans. Of the remaining land, 2 acres are fenced-in pasture that was originally used for horses, but I made use of it to raise a couple of French Alpine milk goats. The goats loved the field grasses mixed with a variety of weeds. I quickly saw the need to store up some hay for winter. Since I only had two goats, I knew I wouldn’t need much hay for the winter months, and I figured I could make my own hay from the pasture. For the amount of hay I needed, I knew I could scythe the hay and dry it with no problem. However, the challenge would be baling hay.
Commercial balers are expensive and would’ve been considerable overkill for what I needed. So, I searched online and found two videos of a similar small baler, one being used in a churchyard in England, and almost the same design being used by a guy in East Texas for baling pine straw. However, neither video provided any plans for constructing the baler. That presented me with the need to get creative. The following is what I came up with.
The baler consists of a box with a door and a compressor bar that pushes the hay down from the top. After some experimentation, I was able to build the baler in just a couple of days. I used scrap wood I had lying around and spent about $50 on hardware and baler twine. I also used a battery-operated drill with drill bits and adapters to drive in screws and to tighten nuts, a table saw to cut the plywood and lumber, and a portable saw to cut the slits in the door.
The Baler Box
The actual dimensions of the baler’s box can vary, but the larger you go, the more physical strength you’ll need to firmly compress the hay. The resulting bale will also be heavier.
I used 1/2-inch plywood, but I wish I’d used 5/8- or 3/4-inch because of the amount of physical pressure being put on the baler. Exterior-grade wood is preferable.
Materials
- Wood screws
- Eye hooks (2)
- Stabilizer boards: 44-inch-long 2x4s (4) and 21-inch-long 2x4s (2)
- Sides: 13-by-44-inch piece of plywood (2)
- Back: 21-by-44-inch piece of plywood
- Bottom: 14-by-22-inch piece of plywood
- Bottom string divider: 12-inch-long 5×1 pine board
Use wood screws to attach the longer 2x4s vertically to the outside edges of the side panels. Make sure the 2x4s are flush with the edges. Screw through the plywood into the 2x4s. Then, stand the two side pieces vertically with the 2x4s facing outward. Screw the back panel onto the back 2x4s. Stand the box upside down and screw the bottom plywood onto the bottom surfaces of the 2x4s. Attach the shorter 2×4 stabilizer boards perpendicular to the longer 2x4s on the bottom sides of the box.

Stand the box upright. Screw the bottom string-divider board to the exposed side of the bottom board, in the center (see photo B). Screw one eye hook on either side of the center of the board. The purpose of the string-divider board is to act as a separator between the two baling strings. You’ll later force the baling string between the outer edges of the eye hooks and the edge of this center board. The string will pop out of this placement when you put pressure on the rope to tie off the bale.
Attach two screws near the top of the outside back of the box, placing one screw about 10 inches from each outside edge, in line with the eye hooks on the bottom of the baler. These screws should stick out enough so the baling string can loop over them while the baling is in process.
The Door Materials
- Hinges (2)
- Sliding locks (2)
- Wood screws
- Door pull
- Door: 20-by-38-inch piece of plywood
- Top and bottom braces: 21-inch-long 1×2 wood strips
Cut two vertical slits in the plywood 1/2 inch wide and 2 feet long. Center the slits vertically and make sure each is about 7 inches from its respective side (see photo, A). This will determine where the twine ends up on the bale. Once the door is installed, these slits should line up with the eye hooks on the bottom of the baler and the two screws on the top back of the box.

Mount the door onto the front of the baler with the hinges and sliding locks. The bottom of the door should line up with the bottom plane of the baler. Screw the bottom and top braces just below and above the door, connecting the 2x4s on either side (see photo C). These will keep the vertical sides of the box from spreading apart. Finally, add the door pull to the center of the left side of the door.
The Compressor Bar
The compressor bar is what’s used to compact the hay bale inside the baler. It’s also the most complex part of the baler. It consists of four parts:
- The mount on the upper back wall of the baler box.
- The long handle that connects to the mount by means of a swivel bolt.
- The swivel connector board that joins the handle to the plunger.
- The plunger that connects to the handle on a swivel bolt.
Compressor Bar Materials
- 3/8-diameter 6-inch machine bolts with washer and nut
- 3/8-diameter 6-inch swivel bolts (2)
- Mount: 20-inch-long 2×4
- Handle: 39-inch-long 2×4, and 24-inch-long 2×4 (2)
- Connector board: 25-1/2-inch-long 2×4
- Plunger: 13-by-16-inch piece of plywood, and 11-inch-long 2x4s (2)
Mount: Drill a bolt hole in the wide side of the 20-inch mount board 1-1/4 inches from the top. With the narrow side of the mount facing the box, bolt them together using the machine bolts with washer and nut. The board must extend 10 inches above the top of the box.

Handle: The handle consists of the 39-inch-long 2×4 and the 24-inch-long 2x4s. Sandwich the longer board between the two shorter boards with 9 inches of overlap on the longer board; use machine bolts to attach the boards together (see photo D). Join the two shorter boards to the mount at the opposite (lower) end with a swivel bolt.
Drill a hole through the two shorter parallel boards 11-3/4 inches from the upper end (about 2-3/4 inches from the end of the long board) of these parallel boards. The end of the plunger bar will be attached here so it can swing freely.
Plunger: The plunger consists of a 2×4 connector board attached to a piece of plywood. Center the 25-1/2-inch-long 2×4 (connector board) on the plywood and bolt it. Then, place the 11-inch-long 2x4s parallel on their narrow sides on either side of the connector board and bolt them to the plyboard (see photo C).
Insert the end of the connector 2×4 between the two parallel 2×4 boards of the handle to trap it there, and bolt it with a swivel bolt. The plunger bar should swivel freely.
Making a Bale
I used two spools of Tractor Supply’s Polypropylene Baler Twine. This worked, but it would break occasionally when I tied off the bale. Besides, it was synthetic. I’d rather have used natural jute twine. It’s not really necessary to buy two large spools if you’re baling by hand. You can use one and wind off enough to use for the second line in the bale.

To make a bale, first lead two ends of string through the front of the two vertical slits in the door. Pull it into the box and trap each string between the inner edge of the eye hook and the center string-divider board. Then, tie a non-tightening loop to the leading ends of the string and hook them over the screws in the back. Close the door and lock it tight. Stuff dried hay into the top of the box until it’s a third full, and forcefully push down the compressor bar. Repeat this twice more and the bale should be ready.
Slip each string off the screws in back and lead the loops through the top parts of the door slots from the inside. Cut the strings from the spools and lead the cut ends through the loops that stick out from the tops of the slots. Pull down hard and knot them firmly. Open the door and pull out the bale.

The bales I make in this baler consistently weigh 15 pounds. When I have an excess, I put them up for sale on Craigslist and mention that they weigh 15 pounds compared with the 40-pound bales we’re used to. I also mention that they consist of field grass and weeds. This garners interest, as the bales are lighter, and goats prefer weeds over grass.
Bob Hackenberg is a retired university professor and software developer. He’s an EV aficionado and has two Teslas.


